Saturday, March 15, 2014

Challenge #58

New Challenge

We are back again with another great challenge.  And let's talk about the word challenge for a minute here.  I found this color palette very difficult to work with.  To incorporate all of the colors was the challenge, it wasn't necessarily the colors themselves that was difficult, it was using them ALL.  Good luck and have fun with it.

With that being said, lets take a look...


Deadline for this challenge is 
March 31 at midnight EST

Guest Designers

We are so happy to have one of our fabulous guest designers back with us again this time around...


Design Team Inspiration

This challenge's tutorial is done by one of our co-founders Lisa Haiss.

The funny thing about this...I assigned myself this challenge, sat down on Wednesday to create a page and totally forgot to take pictures of the process.  So, I started over and it turns out that I liked this page even better.  Also, before I get started, let me apologize for the darkness of these pictures... I couldn't sleep last night and was up at 5 AM, so thought I would enjoy my coffee while scrapping!  :-)


The first thing that I normally do when presented with a color challenge is attack my scraps box.  I'm not one to throw anything away because I can always find a use for it.  Searching through the scraps, I pull out all the colors that match the current challenge.  It doesn't mean that I will use all that I pull, but it at least gives my a jumping off point.


Next, based on what I pulled from my scrap box, I then find a BG paper.  I had already chosen my picture at this point and I knew that I wanted to show movement on the page, so, I chose this paper that really kind of hurts the eyes to look at for too long, but really does well with our color theme.  You can see that in the picture below.


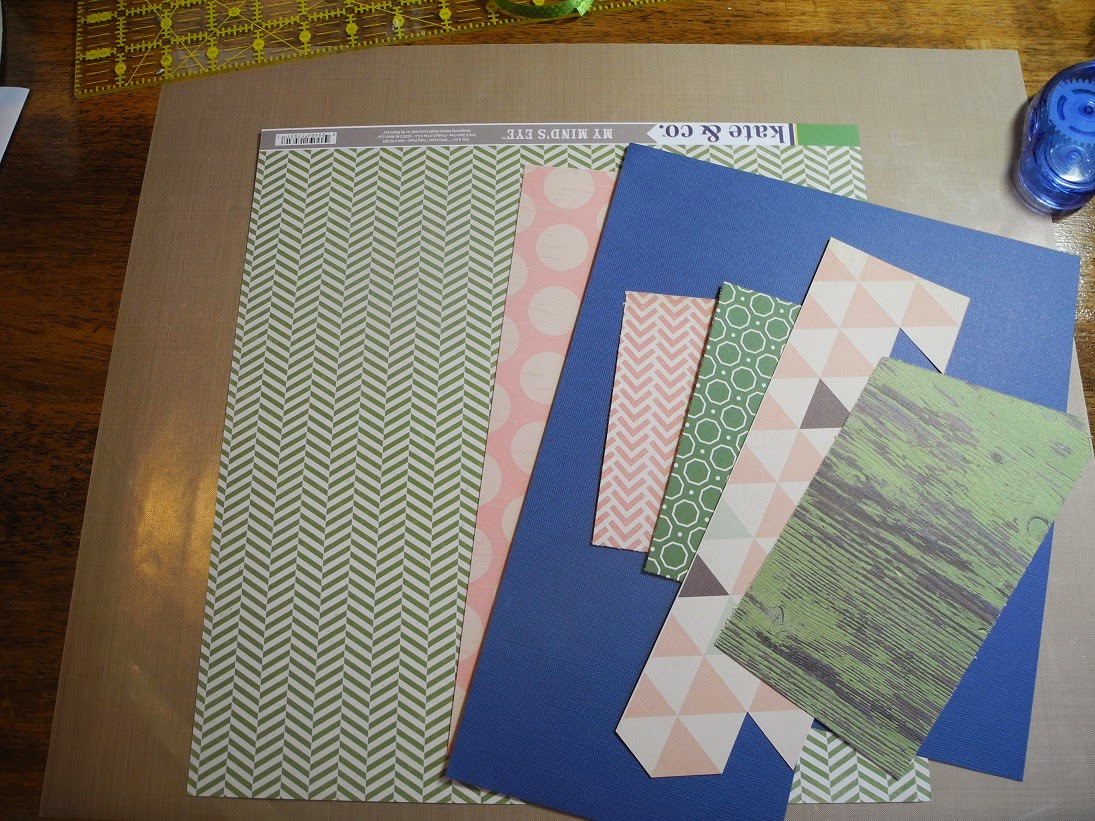
My BG paper came from My Mind's Eye, but as for the others... don't ask, because I can't remember.


I weeded out the ones I didn't like so much and above is what I'm left with.


For this particular page, I worked from a sketch that I had designed some time back and never used.  The picture above show the layout with none of the details.


After I have the general layout done, I go through all my stickers and embellies and pull those that match in color and in theme.  Once again, the stuff that I pull just gives my something to start with.  I rarely use all that I pull, but I'm a visual person and need to see what I have.


The original layout was too flat to me, so I had to add some texture.  I found this piece of weaved twine to place under the picture and I also punched the blue paper.


Since the picture itself is so dark, I needed more color underneath it, so I added the green ribbon.  I also started to mess with the embellies a bit.  There are gears on each side of the picture.  (I should have taken a closer shot of this, so I apologize).


To add that pop of fuchsia that is in the color scheme, I decided to paint some chipboard letters.  They were far too bright for my liking, so I ended up inking them to tone them down a bit.


In addition to my scrap box of papers, I also have a scrap box of embellishments and miscellaneous cutouts that I had not used.  I came across this black star and decided to slide it under the blue to ground the entire page and the bright pink chipboard piece.


Hope you enjoyed following along with my design process on this page.  It's interesting to me to watch other designers go through their process, because really, there is no right or wrong way.

Debi Clark


Caroli Shult


Tammi Bennett


Valerie Andrieux


Mary Bennetts


Crystal Schneider


Lisa Haiss


Leanne Kroschel


Alexandra Boehnke


Stephanie DiSabato


Lynn


Thanks for stopping by and supporting our challenge blog.  Don't forget about our fabulous prize this month!  Be sure to link your creation by the end of the month to be in the running!


Wednesday, March 12, 2014

February Favorites

I find it so difficult to pick favorites each month.  There were so many great pages and I guess that is why I leave this task to my fabulous Design Team. I put all the pressure on them and I just relay the results!

Funny, I knew that I was going to scrapbook today because it was the only day this week that I didn't have anything going on (except laundry)... and I look out the window to yet another snow storm.  We are supposed to get 10 inches of snow.  And, of course, there is no school.  I told my boys that this might be the last snowstorm (fingers crossed), so they had to play outside (so I can scrap uninterrupted)!  There seems to be a wrench in all of my plans lately.

Enough about my winter whoas and on to the reason you are here.  The DT favorites for February are as follows:


Congratulations to all our winners.  We would love to have you back as guest designers for the month of April.  Please send me an email at colormescrappy@gmail.com for details.


Sunday, March 9, 2014

Tip of the Month - March

I love to organize things.  My husband has said in the past that I should start my own business organizing other people's homes.  And maybe, someday, I will...

But for today, the topic is:

How do you organize your scrapbook paper?

I know, you are thinking, which kind, right? Well, there is patterned paper, cardstock, paper pads, kits, and of course scraps.  And of course, there is no right or wrong way to organize these.  Really, the best option is to figure out which system works for you.  I've searched the internet and along with personal experience, I've narrowed down some of the most popular and economic methods below:

The No. 1 method for storing kits is hanging them within the plastic bag they came in.  That way, as you use them, the scraps can be placed back in the bag for future use and all those bits and pieces won't get lost or misplaced.  The picture below is that method in use.


Are there other methods of storing kits?  Yes, but this is the favored method!


As for patterned paper and cardstock, there really are a lot of ways to manage this task.  First, you must decide if you want the two separated or if you wouldn't mind them mixed together.  Personally, I separate my pattered paper from my cardstock and then file them by color.  This method is similar to the picture below...


I have a category for each of the following colors:

White
Black
Blue
Green
Yellow
Orange
Pink
Purple
Red

And then I separate my patterned paper in the same color categories as above.  I also have a folder for vellum.  Some go as far as separating by manufacturer and color, but personally, I like to mix and match different manufacturers.

Another way to organize paper is in a vertical storage rack.  Again, the shelves could be divided by color or manufacturer, depending on your preference.  I like the idea of vertical storage, and because I don't use this method, I'm wondering if you would have to take the entire stack out to be able to see what is really in there. 


If you use this method, inquiring minds would like to know how it works for you.  Please leave a comment to let us know.

I love to have my paper pads stored in these very durable acrylic magazine holders.


In the above picture, they are used for cardstock, but the same holders can be used for 12 x 12 paper pads. I've found that if you flip your paper pad upside down, you can easily thumb through the pages, without having to take them out, to see if anything catches your fancy.

Below is another great method for storing cardstock.  I am a paper hoarder and there is no way that this small expandable folder would hold what I have, but after I think about it, I think it would work well for scraps.  Again, you could organize by color for easy findings!


As I was researching the internet for different ideas for organizing scraps, this popped up and I really like it.  They used a 12 x 12 album and had organized there scraps within the page protectors.  Ingenious, right?


The picture below is a fabulous idea as well, if you have the space.  This seems like it would take up a bit of real estate and if you are tight on space, it probably wouldn't work for you.  I'm big on using scraps and really don't throw away much and this method would be easy to thumb through to see what you have.


Below is another method that was new to me.  What I found about this method is that some scrapbookers don't have dedicated space for their hobby and this tub with a lid would be great when having to store away your supplies.  Now, even if you are fortunate enough to have a dedicated space, this would still travel well to crops.


Thanks for stopping by and please leave a comment if you can recommend another way of organizing paper.

All of the pictures contained in this post were pulled from Pinterest!  Thanks Pinterest!


Saturday, March 1, 2014

Challenge #57 and new DT Members

Take a seat and hold on...this is going to be one LONG post.


New DT Memebers

First up, let's meet some lovely new DT members.  We are so happy to have them on our team and can't wait to see what type of creative goodness they come up with.


Check out Debi's blog to see some of her latest creations.


We'd also like to welcome Tammi to the CMS Design Team.


And lets not forget about Valerie...all the way from France.

You can check out their Bio's on our DT page.


New Challenge

We are back with a fabulous challenge this month.  It's always interesting to me to try to pick a color combo that I think would interest our audience, but some months there just aren't that many participants.  For this term (March - June), Pam and I really tried to mix it up for all of our followers.

We've also done away with the twist.  We found that our followers don't like being so restricted with so many requirements, so moving forward, we are back to just providing color inspiration.

With that being said, lets take a look at this month's first challenge...


Deadline for this challenge is 
March 15 at midnight EST

Guest Designers

We are happy to present our guest designers for the month.  They truly create some amazing pieces of art.


Design Team Inspiration

Each challenge, we will be featuring a layout by one of our Design Team members.  They will provide step by step instruction on how they made their layout.

This month, we are featuring Caroli.


Hello dear friends of Color Me Scrappy! Today I want to show you how I made my take of current color palette.
I love mosaic designs and this time I wanted to use some triangles to create a background. The first step is to choose the papers, I use papers from different collections of Echo Park, American Crafts and Imaginisce. I also used some vellum and this cute little alpha from Lily Bee.


I decided to use these pics from my little girl when she was learning to walk, i think they fit perfectly the color combo!

Once chosen the papers I cut squares of 4cm and then cut them into triangles.

And now all you have to do is combine different colors and patterns to create the background. As you can see, I also draw some lines on the bottom for my journaling.

Then, I placed some vellum and then a tan color patterned paper. I love the effect of vellum because it adds layers but it let us see the background still.

Now the most important elements of the layout: the pics!

For my tittle I used this word "wish" I cut with my Cricut machine, isn't it gorgeous? :)

For completing the tittle I used the alpha from Lily Bee. I love combining different fonts and alphas on my titles.

Finally I used some golden Thickers to finish the title, I think they fit perfectly with the vintage look of the color combo and the pics. Also, because gold is like a basic color for me, haha!

And talking about gold, why not using some gold sequins? I added few here and there, even hid some insidde the vellum, I think they look cute.

Here is the layout  all done. I added some more Thickers to indicate the year and that's all, a super quick layout made with scraps of paper, I bet you have tons of inchies waiting for being used ;)


Here you can see some closeups


Hope you liked this simple layout and try the triangles idea. Thank you much for visiting us and don't forget to play along with us at the current  challenge. Big hugs!


Debi Clark


Tammi Bennett


Valerie Andrieux


Mary Bennetts


Crystal Schneider


Pam Pritzl


Leanne Kroschel


Alexandra Boehnke


Stephanie DiSabato


Lynn


March Prize

Pam and I are happy to announce that we will be rewarding a monthly prize moving forward.  Due to shipping restraints, the prize can only be shipped within the United States.

On the other hand, international participants can be chosen as our DT Favorites.  They will be invited back to be guest designers.

This month's prize is below...


Good Luck everyone and have fun!


SITE DESIGN BY DESIGNER BLOGS